
Stratified Layering of Composite Restorations After the Use of Orthodontic Aligners
The Use of Aligners in Orthodontics
The use of removable aligners has increased greatly over the last 18 years. In 1999, Align Technology addressed the demand for an aesthetic alternative to braces by developing an ‘invisible’ method of orthodontic treatment (Invisalign) that uses a series of computer-generated, clear, removable aligners to move the dentition (Kunicio et al, 2007) Align Technology reports that, since then, more than four million Invisalign cases have been undertaken worldwide.
Aligner popularity has increased in adult patients who do not want to wear fixed braces, as they find them more difficult to tolerate, due to their effect and impact on daily life (Bernabe et al, 2008) The simple idea that a clear aligner can be used to align and reposition teeth is appealing to adult patients.
Patients can remove the aligners for eating, brushing, flossing and important meetings, but can wear the aligners for most of the day Uoffe, 2003). The aligners are usually comfortable and offer ease of use. They are made of polyurethane and are normally 0.75mm thick. Patients are asked to wear the aligners for two weeks and then change to the next number in the sequence of aligners.
Patient Assessment
The orthodontist will normally undertake a full assessment of a new patient. Treatment options are enumerated and discussed.
While fixed orthodontic braces may move the teeth more predictably and quickly, many patients do not want to wear braces. They want the effects of the treatment without having fixed braces. It is often the preference of orthodontists to undertake fixed appliance therapy because it can be more predictable and, in some cases, the teeth can move quicker. However, patients are given all the treatment options to align their teeth and many choose to have clear aligners. There are now several aligner brands on the market that the orthodontist can choose.
A recent systematic review of Invisalign research by Lagravere and Flores-Mir (2005) found that no strong conclusions could be made regarding the treatment effects of Invisalign appliances. It is the personal selection of the orthodontist and their patient.
The Computerised Clincheck
With Invisalign treatment, the number of aligners needed is assessed with a computer scan called Clincheck (Align Technology).
Each aligner is programmed to produce a precise movement on a tooth of about 0.15 – 0.25mm (Vlaskalic et al, 2001).
The stereolithographic technology is used to fabricate custom aligners from an impression, or an intraoral digital image scanned in the dental practice.
Patient compliance is mandatory to achieve good results with Invisalign. It is important for patients to wear their aligners for 22 hours a day or more (Malik et al, 2013)
Once the Clincheck is undertaken, the number of aligners needed is calculated and the position and location of the attachments determined. The attachments are fabricated from clear composite resin and are transferred onto the teeth with an attachment template. The attachments are removed at the end of treatment. Where interproximal enamel reduction.
A Multidisciplinary Case – Which Treatment First?
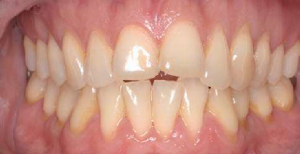
This case involved multidisciplinary treatment including orthodontic treatment, restorative treatment and aesthetic home whitening treatment (Figures 1 and 2).
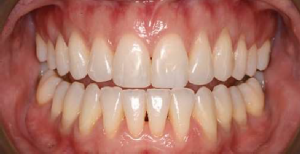
Invisalign treatment was commenced first (Figure 3) After the teeth had moved significantly, when the central incisors had straightened and towards the end of treatment, tooth whitening was undertaken in the upper and lower aligners (Figure 4).
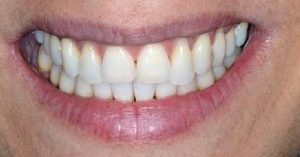
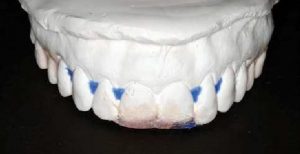
Once whitening was satisfactorily completed, new retainers were mode from new study costs (Figure 5). Composite bonding was undertaken (Figures 6-8) to repair the worn and shorter incisal edges of the upper central incisors. This was followed by glass ionomer treatment placed in the lower cervical areas to reduce sensitivity.
Normally, class V glass ionomer restorations are placed first prior to commencing any treatment as this helps to reduce sensitivity during whitening and also reduce sensitivity of the orthodontic troy rubbing against the cervical area of the tooth. However, it was decided that the erosion of the cervical areas was not on area of concern and so Invisalign ‘Each aligner is programmed to produce a precise movement on a tooth of about 0.15-0.25mm’ treatment was started first.
Whitening treatment was next followed by composite bonding and class V restorations. The cervical areas of the lower premolars become extremely sensitive during whitening, so after whitening and waiting for the bond strength to improve, the areas were restored with a light cured glass ionomer restoration.
Orthodontic Treatment
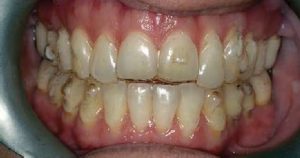
In this case, the patient’s main concerns where the uneven smile and the shortened upper central incisor teeth. The characteristics of the malocclusion were as follows:
- Class I molar and canine occlusion
- 5mm over jet
- Proclination of the upper and lower incisor teeth
- Mild lower anterior crowding
- Upper incisor irregularity
After a new patient consultation and a treatment planning discussion where all the options were discussed with the patient, she elected to have an orthodontic assessment to explore the options to move and align the teeth. She was presented with two options, that of fixed braces or aligning treatment. She requested that aligning treatment was undertaken. PVS impressions were sent to Align Technology for conversion into 3D study models using the company’s software
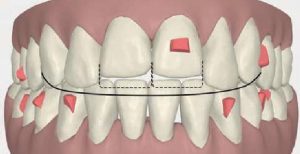
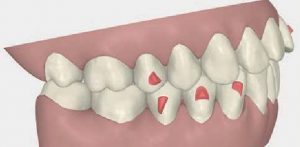
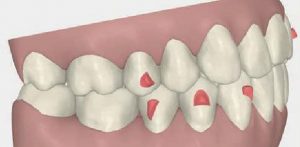
The Clinched Pro software was used to modify the initial set-up (Figures 10 and 11) When finalised, 20 upper and lower aligners were prescribed, giving a treatment duration of about 10 months (Figures 12 and 13). IPR, totaling 1.2mm in the lower arch and 2.4mm in the upper arch, was prescribed. IPR was necessary to make space to correct the crowding the decrease the incisor protrusion.
Treatment proceeded as expected with no complications or need for refinement. The patient was compliant and wore the aligners 22 hours per day. When treatment was finished and the restorative treatment completed, fixed retainers were bonded upper (palatal) and lower (lingual) on the incisors and canines.

The Retention Phase
Normally, the final aligner acts as the retainer in most cases of Invisalign treatment. Despite extensive research, the various elements leading to relapse of treated malocclusions are not completely understood, which makes retention one of the most challenging aspects of orthodontic treatment (Kuncio et al, 2007)
However, in this case, immediately after composite bonding, the upper retainer was cut in the incisal area to allow for the increased incisal length. New impressions were taken after completion of the restorative treatment and new retainers were made to ensure that the occlusion was well maintained. It is essential to stress that patients should wear their Invisalign retainers as prescribed by the orthodontist to ensure stability of the occlusion and correct alignment of the teeth.
In a comparative study of the retention of fixed braces versus Invisalign retainers, Kuncio et al (2007) found that, in many cases, aligner treatment can relapse more than fixed braces, and so patients are instructed to continue to wear their retainers for maintenance treatment.
However, the total number of patients in each group was 22, which is a very small number and further research is necessary.
Whitening in Invisalign Aligners
Using the Invisalign aligners as whitening trays has become a viable treatment option for patients.
The recommendation is to wait for a month after the first aligners are placed and after the initial discomfort has settled down. The patient applies the whitening gel directly into the aligners. A similar Van Haywood protocol can be adopted, namely to whiten the upper teeth first followed by the lower teeth.
The upper teeth whiten quicker and have fewer side effects and so the first stage of whitening is relatively simple. The lower whitening normally takes longer. It is thought that this is due to the wash-out effect of the salivary glands.
Due to the rigid nature of the aligner, it seems that whitening may occur quicker than a normal bleaching tray, but this has not been studied significantly. Most aligners do not reach over the gingivae, so the gingivae may be less irritated during whitening. There is no effect of whitening around the orthodontic attachments, and the whitening occurs in a multidirectional way and can whitening around the attachments.
Whitening and Composite Bonding
It is essential after completion of home whitening treatment to wait for a period of two weeks to allow all the oxygen to be dissipated from the tooth and for the shade to settle to the actual shade.
After tooth whitening, there is maximum saturation of oxygen inside the enamel. This causes a reduction in bond strength of 20%. It is thus essential to wait for two weeks for the enamel bond strength to recover back to the normal levels prior to commencing direct bonding onto the surface of the tooth.
Stratified Layering Technique
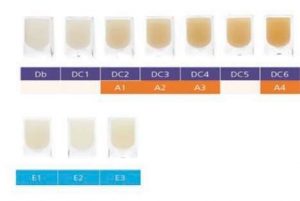
With the introduction of multiple component composite systems, it is now possible to create beautiful natural restorations using multiple layers of composite using their different optical and material properties. The Aura composite system is ideal as it contains both enamel and dentine shades (Figure 9).
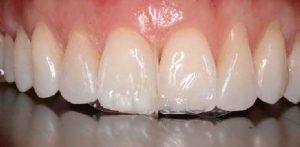
The enamel shades are a microfill composite, which give the properties of a glass-like appearance of natural enamel (Figure 5). The dentine shades ore a nanohybrid material (Figure 6), which gives extra strength for occlusal build ups and they can be used as a bulk-fill material. There are separate bulk-fill syringes available for this purpose.
Shade Selection of Composite Resin
According to Vonini (1996), it is essential to undertake a detailed evaluation of hue, chroma, opalescence, and fluorescence of the tooth in order to simplify the composite stratification technique.
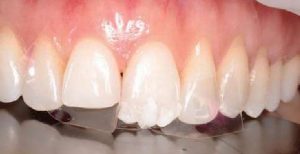
This is done early in the clinical procedure to ensure that there is no dehydration of the tooth when the tooth is fully isolated (Figure 5).
Once the tooth is fully isolated, it dehydrates and lightens, and this can result in the selection of a shade that is too light. Blends of composite colours are normally used and, after selection of the translucent enamel shade (Dietchi, 2008), the dentine shade is used (Figure 6)
The hue is given by the dentine. The hue remains the same, although the greater thickness of the enamel interferes in its perception, giving it a less saturated aspect. Therefore, the hue of the tooth is given by the dentine and influenced by the enamel. The enamel does not change the hue, but only confers a greater or lesser saturation or chroma according to its thickness (Franco et al, 2007).
This is applied from darkest to lightest to give the restoration a lifelike appearance. Different translucencies may be selected for the mesial corners as, often, these ore more translucent than the distal corners (Figure 7).
Used with an understanding of tooth morphology, restorative material selection, colour options, and the physical properties of light, these layering techniques allow optimally aesthetic restorations to be predictably achieved (Terry, 2003).

Applying the Composite Resin
A test run is undertaken first using a variety of composite shades. A clinical photograph is taken after the first test to review how the shades appear on a digital photograph. A polarised light photograph can also be taken to understand the nuances of the existing anatomy of the tooth, which needs to be copied.
As the teeth have been bleached, the bleaching composite shades can be used. In Aura composite, the DB shade blends very well to the bleached enamel (Figure 8) The enamel shades are tested first and light-cured followed by the dentine shades.
Placing the Layers
Normally, the tooth is built-up from the palatal port first. A clear matrix is adopted to help form the shape of the missing incisal edge.
A wax-up can be used and a silicone stent can be mode for ease of placement and for patient and dentist visualization of the final outcome. The clear matrix is curved and rolled in the operator’s gloved hand to form a curve. This is placed on the missing incisal edge and bonded into place using a dentine bonding agent. This helps to keep the hands free so that the layering of the composite can commence.
The layers are placed into the area with a flat plastic tool and then sculpted into place and refined with a fine haired brush dipped into bonding liquid or a rubber sculpting instrument.
The tooth is built-up in layers and light-cured (Figures 6 and 7). Each layer is checked after placement and modifications mode as the restoration takes shape. Once the layering is completed, the final form is created with finishing instruments. Sof-lex polishing discs (3M Espe) are used first to remove any bulk excess and then fine flame finishing burs are used. After the form is completed, the patient is asked to sit up so that the incisal edges can be checked from the front of the patient. When the dentist is in a working position behind the patient, there is tendency to build the incisal edge restorations too long. This final length of the incisal edge is checked when the patient is supine in the choir.
The occlusion is checked, and the final polishing can commence with the use of rubber wheels and a felt tip rubber wheel and polishing paste. The final glossy layer is created with a special rotary rubber wheel and polishing paste.
Conclusion
A multidisciplinary case such as this requires essential communication between the specialists undertaking the treatment, and also between the dentist and the patient, so that the patient is fully aware of the risks and the benefits of the different treatment procedures, and what is involved in each treatment so that on ideal outcome con be achieved.
The patient also needs to be fully aware of the retention phase needed to maintain the teeth in same position, and to maintain a beautiful smile and when further whitening may be needed. In addition, any repairs to composite need to be detailed and occlusal checks need to be mode regularly to maintain a beautiful smile. From time to time, during recall appointments, further polishing of the composite may be required, including retention recall evaluations.
References
Bernabe E, Sheihom A, de Oliveira CM (2008) Imp acts on daily performances related to wearing orthodontic appliances. The Angle Orthodontist 78(3): 482-486
Blank JT (2006) Creating translucent edge effects and maverick internal tints using micro hybrid resin. Prod Proced Aesthet Dent 18(2) 1 3 1-1 36
Dietschi D (2008) Optimising aesthetics and facilitating clinical application of free-hand bonding using the ‘natural layering concept’. Br Dent J 204(4): 1 81-1 85
Franco EB, Froncischone CE, Medino-Valdivia JR, Baseggio W (2007) Reproducing the natural aspects of dental tissues with resin composites in proximoincisol restorations. Quint Int 38(6) 50 5-5 10
Houle JP, Piedode L, Tod escon L Jr, Pinheiro FHL (20 17 ) The predictability of transverse changes with Invisalign. The Angle Orthodontist 87( 1 ): 19-24
Joffe L (2003) Invisalign: early experiences. J Orthod 30(4): 348-352
Kravitz ND, Kusnoto B, BeGole E, O brez A, Agron B (2009) How well does Invisalign work? A prospective clinical study evaluating the efficacy of tooth movement with Invisalign. Am J Orthod Dentofociol Orthop 1 35( 1 ): 27-35 Krieger E, SeiferthJ, Marinello l, Ju ng BA, Wriedt S, Jocobs C, Wehrbein H (201 2) Invisalign treatment in the anterior region: were the predicted tooth movements achieved? J Orofoc Orthop 73(5): 365-376
Kuncio D, Mogonzini A, Shelton C and Freemon K (2007) Invisalign and Traditional Orthodontic Treatment

